I created this clay project by making a lot of odd shapes and putting them together. I made a lot of spheres, for the hair, out of clay my rolling them in a circular motion. To secure them I would make silts in the bottom of the spheres and then I would put slip on them then press them again an even larger sphere. For this project we had to combine an animal with something that wasn't an animal. I had no idea what I wanted to do for this project so I actually combined quite a few things together such as: a cyclops, grapes, and a turtle shell. This caused quite an odd outcome. If I were to change something about this project I would probably choose a different color scheme, I had no idea what colors I wanted to use for this besides purple.
Thursday, December 12, 2019
3D Art Plaster Sculpture Blog Post
I created this plaster carving by using tools to carve out pieces of the plaster mold. This was a lengthy process due to how long it takes to carve, It took about a week to carve out my design. I decided on the design by looking up images of koi fish. I chose to base my design off of koi fish because I like the color of koi fish. If I were to change something about this project I would make the fish look more like koi fish, and I would probably make the water a lighter color.
Thursday, October 10, 2019
3D Art Basket Weaving Project
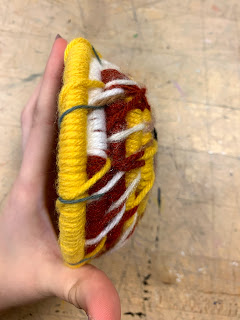
My favorite thing about this project was wrapping the different colored string. I could of improved my work by finding a way to put the string through better. I chose my design by choosing multiple different string colors the make the basket with. I chose many colors so it would look intriguing.The first step we took was cutting a piece of the coil. After we cut the coil we would wrap the coil in a snail shape to make the base of the basket. To make the project function we had to wrap the string around the coil multiple times. After we wrapped the string around the coil we thread it to the string before it. Once that string was used all up we would then start wrapping a new string around the coil. I wish I would of been more patient with this project so it would look better.
Monday, September 23, 2019
3D Art Cardboard Relief Project
Our project in 3D Art was to make a 3D sculpture with cardboard and have a word relating to what we built. So, for my project I built a desk lamp and the word I chose was "Shine". My favorite thing about this piece was building the stand for the lamp. Building the stand was my favorite part because I liked how It looked just how I pictured it to look. I chose to make a lamp and use the word "Shine" because I when I was struggling to think of a word to use a one of my favorite songs "Shine" by Pentagon came on. This gave me the idea to make my word for the project "Shine". I chose to use a lamp because it was something that emitted light that wasn't the sun because I didn't want it to be cliche. I made is work by tearing, cutting, and bending lots of cardboard. If I could make one thing different about this project I would of made the lamp shade smaller so it doesn't look bigger than the base. I used 3D elements by making 2 of each letter and putting a smaller piece of cardboard in between each letter. I made the base 3D buy first making the shape, then I ran the lamp stand through it. After that I stuffed the base with cardboard for weight. Then I glued a piece of cardboard on the bottom of the base so the cardboard I stuffed in it would not fall out. These are some of the steps I used to build my lamp.
Thursday, August 29, 2019
3D Art Tissue Paper Lantern
My favorite part about this project was designing the piece. I really enjoyed this part because I liked seeing what I wanted to do when I got the materials. I think I could of improved this piece more if I cut the tissue paper correctly. If I were to cut the tissue paper to fit in the reed space better I think It would not have as much of a "sloppy effect". My first design was of the Eiffel Tower. When I started to make the piece I changed my mind. I decided to make the bottom half the Eiffel Tower, which I already started to create. Then I decided to make the other half of the lantern a chinchilla .
Monday, August 12, 2019
3D Art Sketchbook
In 3D art class we created our own sketch books. To create these sketch books out first step was to measure an inch on the tag board and mark the inch. After we did that we would cut along the line that we measured. Our next step was to glue the piece together to make the spine of the sketch book. Then we moved on to decoration. For decorations you can paint, glue paper, draw, or do anything that would decorate it. I chose to cut and paste colorful paper to decorate my sketchbook because I never tried it before. We then proceeded to put in the actual paper. We folded and glued the paper to make our sheets. The end result folds out like an accordion. If I were to do something differently with this project I would of painted my sketchbook instead of gluing paper on the sketch book.
Subscribe to:
Comments (Atom)


